Today’s post is about how we made this bedhead out of pressed tin panels for our main suite – a nice way of adding impact and charm into our rather small bedroom.

When we gave our bedroom a makeover, one of the major things Mr Nerd and I knew we had to do was upgrade our old 80s chipboard bed. I had invested in a great new mattress, but the bed itself was terrible. It was actually my mum’s old bed frame – from the 80s – and as a child of the 80s I really don’t want to think about what my parents might have done in that bed once upon a time.
But then I moved out of home and hey, I was a 24 year old, full-time freelance writer living in a fixer-upper…. scraping together the funds to buy a new bed fell on my backburner for a few years.
Here’s a photo of my GROWN UP bedroom in my GROWN UP house that I got a GROWN UP loan for. Why do the sheets look like they could belong in a cot? Why is there a stuffed rabbit (Milko) on the bed? Probably because I had such a keen sense of irony. Not because it was freaking terrifying sleeping alone in an old house for the first time in my life, no, not at all.

This was my living room full of hand-me-down furniture when I first moved out of home. Shabby student chic. I seriously had next to no money for furnishings. So don’t judge me holding onto my disturbing parental chipboard sex bed.

Eventually we decided it was time to replace my bed and we had the money to do so!
When my interior designer friend Nelly Reffet from Twinkle and Whistle suggested I try making a pressed tin bedhead for our room, I was like, “YES!” punching the air like a really lame wannabe Rocky Balboa.
This post originally featured on my old blog format here on April 147th, 2014.

I had seen the pressed tin bedhead idea before on Pinterest but would never have thought it could work in our little room – until Nelly suggested it. This is why I think it is totally worth it to call in the advice of an interior designer or an interior-savvy friend to help you with a room if you are stuck. They can look at your space with fresh eyes and envision something you might never have imagined could possibly work! I knew that the pressed tin bedhead would not only take up no floor space in our small 3 x 4m bedroom, where every inch of space counts, if tall enough it would visually create the illusion of more height and add a bit of ‘ooooh’ factor to our little room.
With our new bed ready for pick up, the next thing to do was to start on our pressed tin bedhead. We ordered our pressed metal panels through Jean Morrison at Heritage Ceilings. Jean comes with my highest recommendations. She is efficient, super nice and really knows her stuff on all things design, installation and painting, and she has a fantastic range of really quality panels. If you are looking for pressed tin I totally recommend Jean and her team. Their office is based in Bunbury but they offer freight not just in Australia but all around THE WORLD!
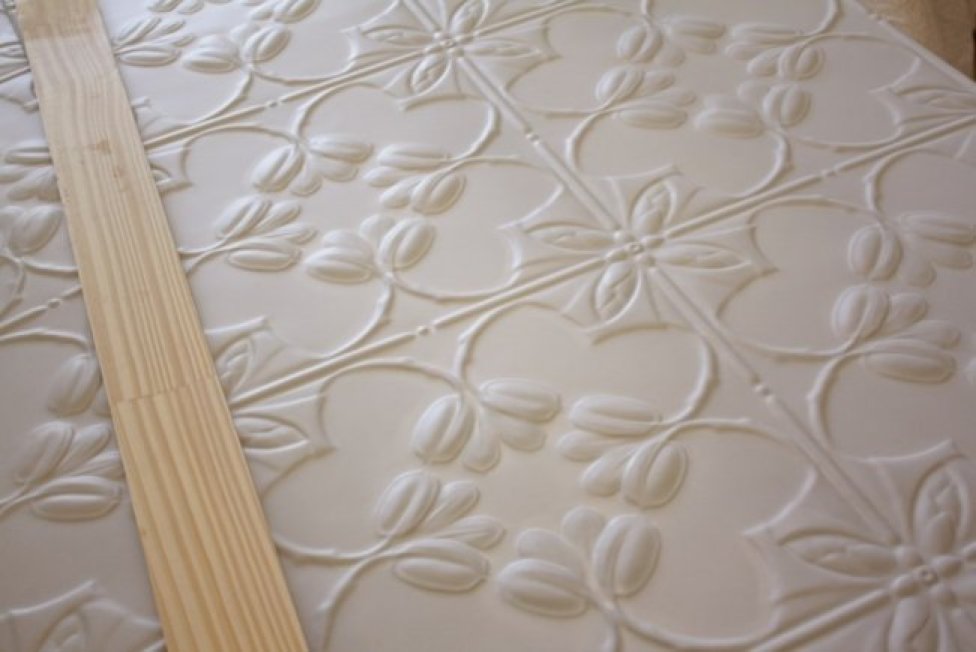
Nelly suggested the Heritage Ceilings Magnolia pattern and I loved it immediately. To me it is what pressed tin should be like – elegant and classic. But honestly, I like all the Heritage Ceilings patterns – you can see them here. There’s not an ugly one!
Overall the whole bedhead project was not as hard as I had been expecting, although that could be because Mr Nerd did most of the hard bits. We started it on a Saturday afternoon after a morning at the beach and aside from painting, it only took about two hours.
Because Jean is an expert on all things pressed metal, I asked her to go through the steps of making a pressed tin bedhead so I can share it on House Nerd. Thanks Jean! You can like Heritage Ceilings on Facebook here and on Pinterest here for lovely pressed metal ideas.

DIY HOW-TO: PRESSED METAL BEDHEAD
Step 1. Choose your pressed metal pattern.
Jean says the first step is to consider pattern choice in relation to the size of the bedhead. “Generally smaller patterns work best for a small area such as a bedhead but large bold patterns can work well if the measurements of the bed head suit,” she says. “Some of the designs measure approximately 60cm square so they are fairly large. It would be a pity to have to trim the outer patterns back by a few centimetres in order for them to fit into the set dimensions of the bed head. But if a person particularly wants one of the large designs for a small project thought can be given to creating a timber or MDF border/frame to fit around the panels to take up the excess in the size of the bedhead.”
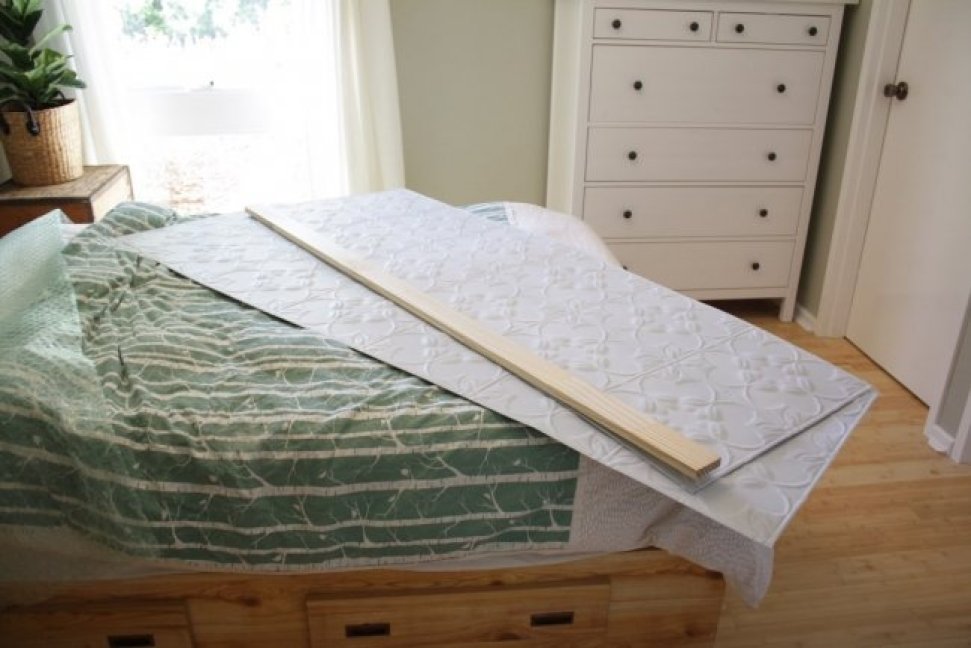
Step 2. Create a plan for your backing board.
You must nail your pressed tin panels to a substrate (no, not directly to your wall). Use a large piece of ply or you can create a frame out of MDF battens like we did, as we wanted a really big bedhead without too much weight on our walls. Jean says for a bed head the ply should be a minimum of 7mm thick. “A thicker ply can still work but it will just make the whole bed head a lot heavier,” she says.

Step 3. Mark where your bedhead is going to be.
Measure out the wall and mark out even sections on either side so that your pressed tin is centred.
Step 4. Check for wonky walls.
Now measure to see if your walls and/or your ceiling are out. In our 70s house, the walls aren’t perfectly straight and in our bedroom, the wall is slightly shorter on one side. So Mr Nerd took all our measurements from the ceiling as you won’t see the bottom of the pressed tin bedhead.
Step 5. Start cutting.
Now you have the area for your bedhead centred and square, you can begin cutting your plywood or MDF battens for your backings. We cut these using the Dremel MotoSaw so that they were the same vertical length as the pressed tin panels.


We use a Dremel MotoSaw for DIY projects like this and it is an awesome handy tool. You might have seen my post on how I used it for the first time. The MotoSaw can be mounted to a table or it can be used in a handheld capacity. It sliced through our wood in no time and it is so easy to use. We didn’t end up having to cut our pressed metal panels to size – but if you needed to, the Dremel MotoSaw would be ideal (perfect for smaller expanses like kitchen splashbacks). It would also be perfect for cutting to size a decorative border for your bedhead.


Step 6. Start mounting your plywood or MDF battens to the wall.
If you create your frame out of MDF like we did, you will need one batten for each edge and each join. Use a hammer drill to drill holes into your walls. We then mounted each batten with masonry plugs and screws. Make sure the head of the screw is flush with the batten otherwise it will push out the pressed tin.


Step 7. Begin nailing your pressed metal panels into place. Never use glue!
Once the MDF is mounted onto the wall begin mounting the pressed tin with small nails in the demarcated dimples along the edges. With each successive piece make sure that you overlap and align the pattern with the previous piece.
Jean says that a popular episode of House Rules saw two of the contestants making a pressed tin splashback in the kitchen – but says it was a great example of how NOT to install pressed tin. “I’m not an advocate on gluing the panels into position,” she reveals. “Some glues are now proving to break down over a relatively short time – a horrifyingly short time in hotter climates! Some sellers of pressed metal openly tell their customers to use glue. Knowing the short amount of time some glues are lasting, I think it is best to avoid them altogether and use the tried and true old method of nailing them up. I know of some people who have used glue and 12 months later they are having problems with their panels lifting away from the backing board. My theory is always that you should minimise the possibility of encountering problems by doing the job properly the first time around.”


Once we learned how super easy it was to nail the panels into place, I wondered why anyone would ever even think to use glue, full stop! “The nails used are flat headed and tiny and they are only ever placed in the decorative areas of the panels,” says Jean. “After the panels are painted the nails are not really noticeable.”
To nail up the sheets we used a Trojan hammer (and we also a Trojan measuring tape. I keep one in the car. So handy to take about when you are visiting stores. A measuring tape I mean, not a hammer. I am not Thor).

Step 8. Ask your stupid husband to take a photo of you doing important hammering stuff.
Get angry hours afterward when you discover he actually took the picture when you were scratching your nose for a split second.

Step 9. Added spice!
If you want to make your pressed tin bedhead that much more special, you can mount framing to the sides and use wood glue to stick it to the plywood or MDF battens. I was happy with a simple, unadorned look. Look at the above photo, please. I know my limits.
Step 10. Paint your panels.
Jean says that the pressed tin splashback on House Rules was left unpainted – another no-no. You need to paint! “The installation was poorly done because the panels were glued and then left unpainted and it is taking me months to set the record straight with my customers!” she says. “When the panels leave the factory they are despatched in an unfinished state. They can tarnish over time if left as is.”
Knowing what I do now when I originally wrote this post…. I’ve changed my tack on what kind of paint to use. While many people recommend an oil-based enamel paint for pressed metal, there’s a problem with oil-based paint in my opinion – it reeks. If you’re not using these pressed tin panels in a wet or high traffic area (like a kitchen or bathroom) and are definitely using it just for a bedroom, I would recommend a chalk paint, which has a built-in primer and won’t have such a strong smell. Oil paint will give you a headache. (Another option would be to paint the panels BEFORE you nail them up and give them a few weeks to cure).


Like the metallic look of unfinished pressed tin? “Some customers like the shiny metal appearance of their panels and they are keen to retain this look,” says Jean. “I always tell them to buy a paint that mimics the metal colour and there are plenty of them around that do so. Painting the panels is important because it enables the nail heads to be covered and some of the paint seeps into the fine hairline joins in the panels thus making the joins appear even more seamless.”

Styling Nelly Reffet of Twinkle and Whistle, photos Heather Robbins of Red Images Fine Photography.


Photo Heather Robbins of Red Images Fine Photography.
Step 11. Start styling.
With your beautiful pressed metal bedhead done, now is a great time to buy a few treats for your bedroom! Forty Winks group manager Kara Norris says you can easily give your bedroom a lift with a few simple design updates. “Clever colour selections and complementing surrounding furniture and furnishings can transform a dull and uninviting space into a bedroom sanctuary,” she says. Kara’s styling tips:
- Bring the outdoors inside with fresh plants, open windows and plenty of light (I bought a fiddle leaf fig for our room, and changing the blinds with white linen curtain and sheers has made it feel light and airy).
- Consider clever storage solutions which maximise space. When choosing colour, consider tones that make you feel comfortable and complement bed linen, carpets, curtains and soft furnishings.
- Consider the bed linen theme you have chosen. You can highlight some colours from your linen to tie in the whole setting together.
- Accessorising with pillows and throws is a great way to introduce bursts of colour.
Step 12. Get a memento.
Ask your friend to take a cheesy photo of you posing in front of your pressed tin bedhead like you made the whole thing all by yourself.

Photo Heather Robbins of Red Images Fine Photography.
