Sometimes I think of a renovating or DIY project and then I become weirdly obsessed with the idea until I get to carry it out. And something I’ve always wanted to try is stencil painting an old concrete or tile floor. I always thought that stenciling looked like fun. (My idea of fun might be wildly different to yours, I know).
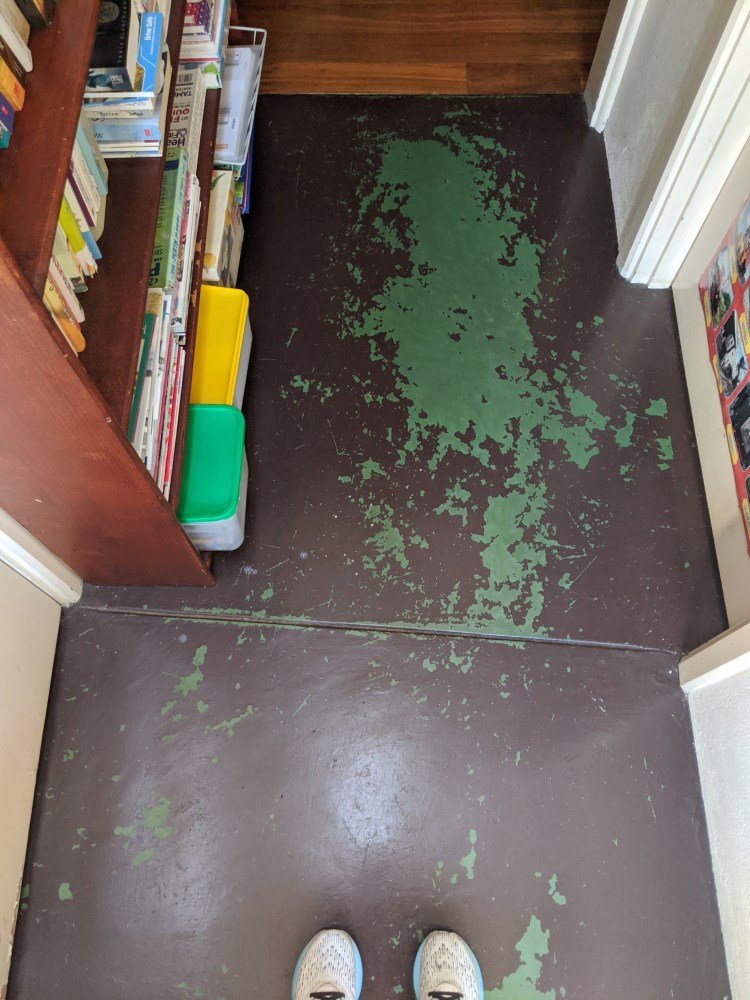
Here’s what this room looked like before I got started… check out what I did!


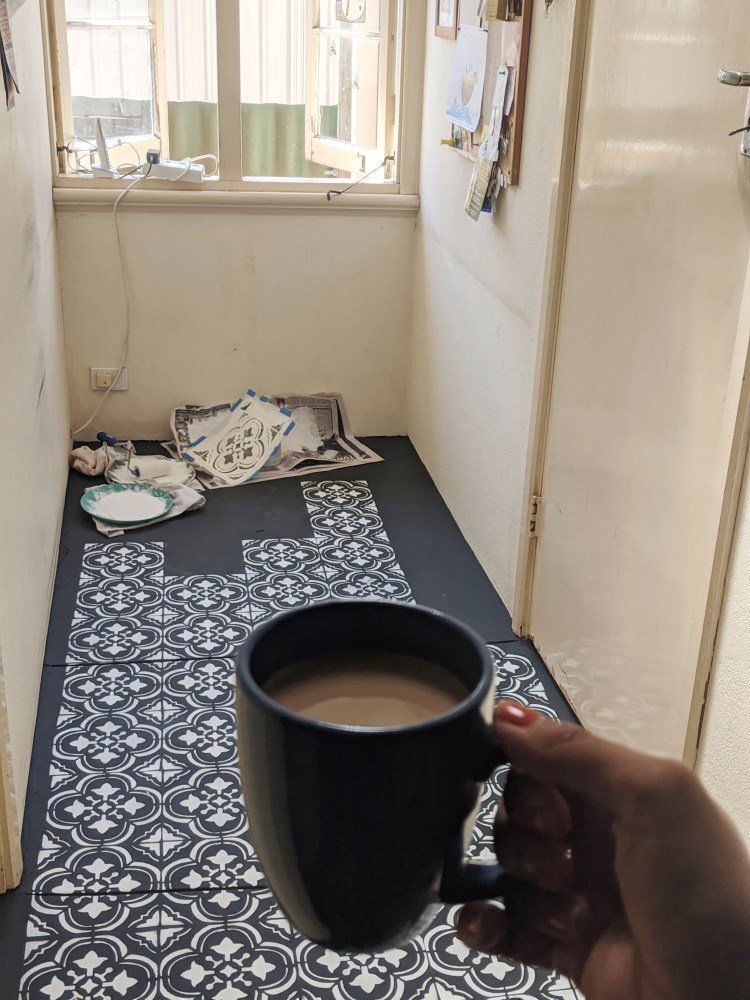
Yep, that floor is just painted concrete! Looks pretty cute now huh?
Late last year, I partnered with Monarch Painting with the aim of producing some DIY videos for achievable, budget-friendly paint projects you can do at home. One of the ideas I pitched to them was stencil painting a concrete floor.
They loved it – my only problem was that I had no such old concrete floor in my home. My mum and dad’s house, however, had the perfect canvas – my mum’s little office nook, with a battered, previously painted, old concrete floor.

I’ve always liked this funny little corner of my mum and dad’s place. According to some writing we discovered on a nearby rafter in the garage, this part of the house was built in the late 1940s. It’s got a cute little skylight and gets lovely northern light all day long.
I thought it would look great with a stenciled floor, and so with a couple of sponsored posts on the horizon, I asked Mum what she thought of letting me give it a little room makeover for the blog. Mum agreed and was very happy about it.

Everyone has been like, “You’re so sweet to paint that floor for your mum, what a nice thing to do.” THIS IS NOT ABOUT MY MUM PEOPLE. This is purely about my own selfish desire to unleash my inner Martha Stewart and stencil something. Mum’s just on board because she gets a room painted for free.
You can check out my Monarch Painting stencil DIY video here 🙂


Despite really wanting to do it, I was a bit nervous about trying stencilling! So first I read a ton of other blogger stories about floor and tile stenciling before I attempted to do it on my own. A great one to check out is Door Sixteen by Andi Kauffman, I love her blog, her style – and her honesty! Stencilling is a cool project and it has so much impact (for not too much outlay) but it can be a tedious process. However, if you do it, it will totally be worth it, trust me!
My first go at stenciling was actually when I did our fireplace makeover that I shared on Instagram a while back. That was my ‘lockdown project’. (I’ve shared it on my Instagram but haven’t blogged about it yet). For that project, I got a custom-made stencil from a great online store in the UK called Dizzy Duck Designs – they sized it exactly to fit the size of our tiles and away I went.
I also didn’t roller for those – I used a dense brush to dab the paint on. It’s definitely different to doing a non-tiled, concrete floor. (For one, it’s kinder on the back and arms!) I think using a roller is faster as well.
Here are the things you will need if you are going to be stencil painting a floor.
WHAT YOU NEED
At least one stencil. I would advise getting two (which I explain more about below).
I got my stencil for this project from Mon Petit Palais Designs in North Perth. This is the coolest and most inspiring paint and craft shop! When I walked in I felt like a kid again. Reminded me of when I was growing up, and Mum would sometimes take us to an arts and crafts shop at the beginning of the summer holidays and you would have all your pocket money all saved up and you would just walk around the store feeling so inspired and creative and EXCITED that you could paint and MAKE STUFF. Well that’s how I felt walking around this shop. I wanted to buy all the paints. Also, Kate is really lovely and helpful and nice. You can order from them online. Etsy and Amazon are also good sources for other varieties.
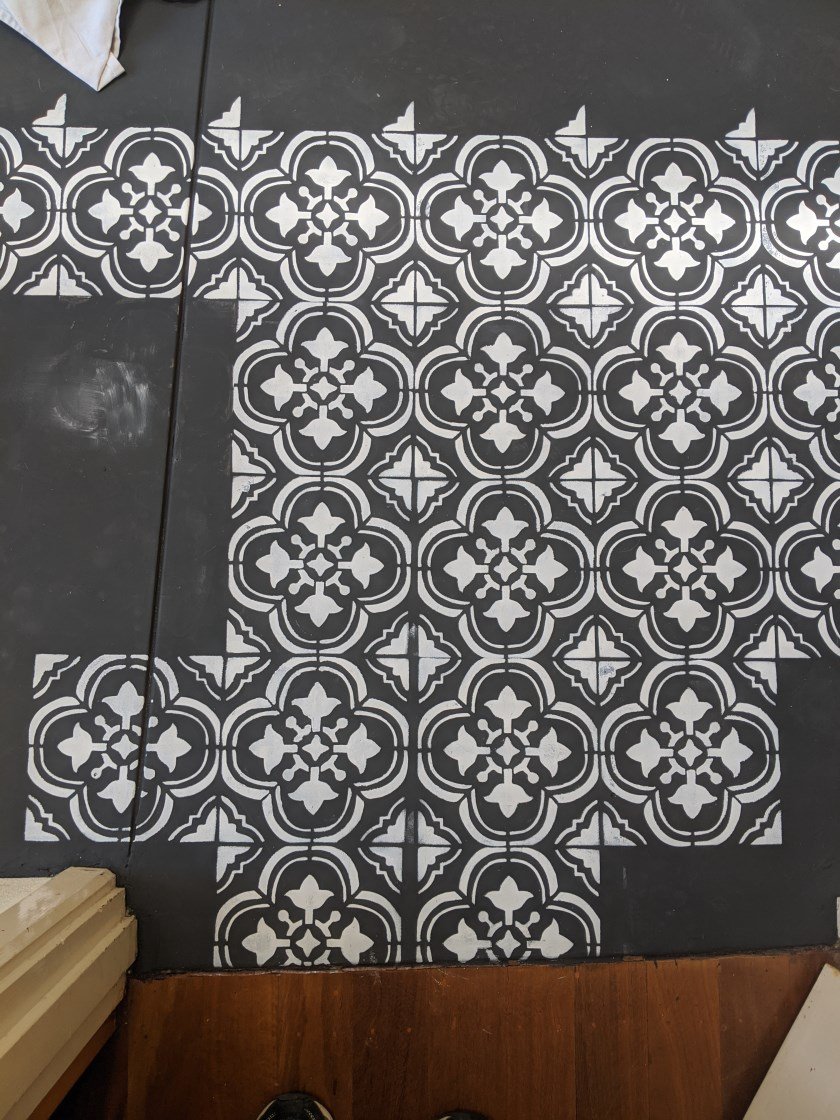
I would recommend getting a stencil that lets you line it up with your PREVIOUS stencil. It will have little guidelines on ithe edges to match it up. Does that make sense? Look at how the stencil below has those ‘extra pattern bits’ on the side – they help you line it up with what you’ve already painted and help keep things even and straight. It makes it much easier than eyeballing it, trust me.


Angled brush for the edges of the floor – I used a Monarch Mini Cutter.
Roller for the base coat on the floor – I used a Monarch Comfort Grip Roller.
A tray or dinner plates for rollering your paint.
Some newspaper or paper for getting any excess paint off your roller. With stencilling it’s better to have too little paint on your roller than too much, which will give a blobby appearance.
Painters tape for sticking down the stencil.
A small roller with a foam roller, like Monarch’s Smart Lock Mini Roller. The foam part is important! You don’t want one of those fluffy fabric roller covers for stencilling because they’ll disperse the paint under the edges of the stencil, making your finished result very messy, and will basically drive you crazy.
A smaller brush for your edges.
Chalk or chalk effect paint – Annie Sloan, Jolie Home, Rust-Oleum Chalked Paint will all work. I bought Jolie Home Paint from Tara Dennis Store for this one; Graphite for the charcoal base, and Palace White for the top. I got a full size tin of each. The great thing about chalk paint for stenciling concrete or tile? If your surface is in good condition (ie: not flaky or peeling) you don’t have to prime beforehand – chalk paint has a built-in primer in it.
A floor varnish (I bought this one) Make sure whatever you get, that it’s compatible with your paints and that you do a sample spot first before doing the whole floor).

WHAT I LEARNED FROM DOING TWO STENCIL PROJECTS
I would buy two stencils next time, not just one. Some places online will supply you with two stencils with an order anyway. Just check. It will make it easier for you because when you get to the end (when you have to start chopping your stencil down to do the small areas) you have a backup in case you make a mistake OR if you realise that cutting one stencil just isn’t going to give you coverage for every spot.
Also, one stencil got gummy with paint pretty quickly, even though I stopped to clean it regularly.
You can also work faster if you have two stencils – if one gets a spot of wet paint on the underside you can just put it aside to dry rather than trying to clean it up (chalk paint dries quickly) or you can rope in a lucky stenciling buddy.

Doing two colours is easier than doing three.
If you have a tiled floor, you can stencil it in one of two ways – either get any size stencil (not worrying about the existing grout lines) OR you might prefer to get a stencil that is exactly the size of your tiles and do it that way. Totally down to personal preference and whether the stencil intercepting the original grout lines will bug you or not. The people who cut these stencils for their job can advise you on the best pattern (that’s what I did when I did our fireplace, I just sent them an email with photos and measurements and asked them if they would mind advising me on what would work).
Put your pets away for a while. I love dogs, I love cats, and my mum’s cat Luna is possibly the cutest freaking thing to have ever walked on this planet (or on my freshly painted floor) but these little cuties will leave a trail of hairs in their wake that you will be constantly brushing away.

Babies and toddlers are not as hairy, but they will also insist on ‘halping’ and will cause more destruction than good.

HOW TO STENCIL PAINT A FLOOR
- First you’ll need to clean your floor really well and then apply two coats of your base colour. I used Jolie Home Graphite using a brush first for the edges and a roller for the rest. Look how much better that looks already!


2. Then you’re going to figure out your starting point. I decided to start on the bit where the jarrah floors meets the concrete and to begin with a full tile there.
If you’re stencilling onto a tiled floor or surface, and are using your tiles as a guideline (ie: your stencil was cut to match the exact size of your existing tile) the process can be a bit different as you won’t have to expand out from what you’ve first done – you can just stencil tiles where you like.

3. Line up your stencil and stick it down with painter’s tape.
3. Dip your foam roller in paint and BLOT it by rubbing it on a plate, a piece of newspaper etc. This is important because if you overload your roller, the edges of your pattern will bleed. You basically want to get rid of excess paint. Too much paint on your roller and it will bleed and get rid of those crisp lines you want.
4. Gently run your roller all over your stencil. This will take some time learning exactly the best way to do it and how to do it. DON’T STRESS about any tiny mistakes or any bits that need more paint – it’s just paint and you can always clean them up, or go over the top of any small, less-than-perfect bits with a brush if you want later. Once you’ve done the whole floor, you won’t tend to notice any tiny imperfections.

5. Peel off your stencil and feel smug and victorious. Enjoy. It’s the last time you will feel smug and victorious for a while, because hours of backbreaking labour will follow over the next few days and you will ask yourself, “Why did I decide to do this?” at least 43 times.

6. Apply your stencil again, making sure to line it up with your previous one. Be careful not to let the part that you’ve already painted smudge, or let paint from your stencil smudge your new area.

7. Repeat this process 24,293 times or until you have completed all your ‘full’ tiles.
8. Once you’ve done all your whole, full tiles, you’ll start cutting your stencil down with a scissors to get to all the ones in the corners and along the edges, like below.
It requires a bit of forward thinking – something I’m not great at – but trust me if I can figure it out, you can too!

You might start needing a smaller brush to get into the edges, rather than a roller.

9. Once you’ve done all the edges and it’s dry, you can go over and do any touch ups.
10. Seal the whole thing. Sealing is especially important for a floor. Look for a sealer designed for your chalk paint or hunt for a polyurethane sealer.
I would do an absolute minimum of two coats, ideally three for durability. I used Jolie Home Floor Varnish.

11. Enjoy your pretty new floor!


SOME OTHER THINGS I’VE LEARNED FROM DOING TWO STENCIL PROJECTS
Stencilling a floor is easier than stenciling a vertical surface like a fireplace or splashback – and in my opinion, rollering is also easier (and faster) than using just a brush, which I did for our fireplace.

Don’t paint yourself into a corner 😉

Give yourself plenty of time. And ideally, a solid chunk of time – a weekend at least. Probably 40 weekends if you have kids. (Kidding… kind of). But yeah, it’s labour-intensive.
Crank the music, get takeaway food and say yes if someone offers to make you coffee (thanks Mum).
If you make a mistake, you can always paint over it and do it again! Can you see where I’ve made a lovely boo-boo below and the spacing is off – I ended up painting over all those tiles on the left.

Just jump in! I was a bit apprehensive about starting stenciling both times but after having done it I think stenciling is one of those DIY projects where it’s much easier to just jump in and DO rather than trying to plan it all out from the beginning.
You’ll encounter things as you go (and you’ll work out ways to solve them!) It’s not as intimidating as it might look. Go for it, you crazy stenciling thing.

Here’s my how to stencil a concrete floor DIY video produced with Monarch Painting. I’m not super comfortable in front of a camera, and can’t imagine I ever will be, but its one of those things you get better at with practice and I’m proud of this one.
I love the finished result actually more than I thought I would. I really wish I had done this in my own house haha.
Mum and Emma from the Wiggles love it too.

After I did the floor, I did another sponsored post with Dulux to spread the word about their new paint colour forecast for 2021, and refreshed the walls and the doors with Dulux Skip To and Dulux White Exchange.
Skip to was really similar to the wall colour that was already there, just a bit more modern, and doing the yellowed, enamel paint doors with White Exchange made a huge difference.


Thanks for following along! Please leave me any questions if you have them! I’d love to know if there’s something in your home you might like to stencil. Maya x
